
You might remember from a previous article that I have a bit of a homelab setup. It’s nothing too crazy, but it’s there, humming away. And since I already have all this hardware running, a thought struck me: why not use it as my own cloud?
So, I decided to do it. If you are ready, buckle up, because this is going to be a long article. I’ll walk you through all my reasons and the beautiness of building something like this from scratch using TrueNAS, Nextcloud, Cloudflare, Adguard, Tailscale, Nginx, and a few other bits and pieces.
I’ve tried to keep things as simple as possible, especially if you’re new to this. Hope you’ll enjoy it!
Why I Ditched Google Drive (And You Might Too!)
Alright, let’s get into the “why.” Why go through all this trouble when services like Google Drive or iCloud exist? Well, for me, it boiled down to a few key things.
First off, I just want to own my own data, not rent it. It hit me one day that I’m shelling out cash every month to Google Drive, iCloud, and a bunch of other services that, honestly, I don’t use that much, or I don’t really need them in the way they’re packaged. Then came the bigger realization: I’m a power user. I can do this stuff. In fact, I earn my living doing exactly this kind of work. So, why on earth wouldn’t I do it for myself? It’s not just about potentially saving a few bucks; it’s about using the skills I have for my own benefit and control.
Another huge reason is privacy and security.
We’ve all heard the horror stories, right? The “fapenning thing,” that big iCloud hack a while back.
Maybe lightning won’t strike twice, but who really knows? We also know that Google Photos isn’t end-to-end encrypted.
Maybe iCloud is a bit better on that front, fair enough, but all that data still sits on a shared system, with millions of users managed under the same umbrella. And things can go wrong.
There was that bug in Google Photos that actually sent people’s private videos to complete strangers. It was a bug they said, but it could happen again.
These aren’t just abstract worries; these are real incidents that make you think twice about where your personal stuff lives.
And finally, I already have the hardware working 24/7 with plenty of empty storage space just sitting there. It felt like a waste not to use it. Of course, I couldn’t just flip a switch. I had tons of stuff already in Google Drive and iCloud. Migrating was going to be a process.
My Mission: Crafting the Ultimate DIY Cloud
So, with all that in mind, I set a clear goal for myself. I wanted to build an:
- End-to-end encrypted: This means only I can read my files. Not the system, not anyone else.
- iOS integrated: My phone is a big part of my life, so seamless integration with iOS was a must.
- Private: My data, my rules. No prying eyes.
- Redundant: If a hard drive dies (and they do! even if it’s not easily, eventually), I don’t want to lose everything.
- Automated cloud replica and storage unit: I wanted backups and syncs to happen without me thinking about it, just like the commercial services.
Basically, I was aiming to replicate the convenience of services like Google Drive and iCloud, but on my own terms, with a strong focus on privacy, security, and data ownership. Each part of this goal directly tackled my reasons for wanting to self-host in the first place.
The Foundation: Building Bomb-Proof Storage with TrueNAS Scale
Every good house needs a solid foundation, and for my DIY cloud, that foundation is TrueNAS Scale.
Why TrueNAS? Well, I chose it because it’s a well-known name in the NAS (Network Attached Storage) world. It has a pretty good user interface (UI), which makes managing it easier, and it’s packed with features. It supports Virtual Machines (VMs) and has a whole system for extra apps because, under the hood, it’s actually based on Kubernetes.
Getting it installed is quite simple. You can find tons of guides and great documentation online. Just burn the image to a USB stick and follow the instructions. One thing you will need, though, is at least two hard disk drives (HDDs).This is super important because you want to set up a proper NAS system with redundancy.
Think of it like having two copies of your data. If one drive fails, your data is still safe on the other (RAID 1)
TrueNAS has a lot of cool stuff built in, like an automatic snapshot process (great for recovering accidentally deleted files), integration with almost every cloud provider (if you want to back up your NAS to the cloud, which we’ll get to), and it supports all sorts of network sharing protocols like FTP, WebDAV, NFS and SMB, many of which I use for other things in my homelab. It’s pretty much the heart of my homelab setup.
For those who might venture into more advanced setups later, it’s also very easy to make a storage provider for Kubernetes using democratic-csi, which is free and open source tool.
But we’re not going to talk about this now. This shows it’s a platform that can grow with you, even if you start simple.
The Star Player: Nextcloud on TrueNAS – My Google Drive & Photos Replacement
With the storage foundation laid, it was time for the main application: Nextcloud.
When you’re looking to replace Google Drive or iCloud with something you host yourself, there aren’t a ton of options that give you that polished, all-in-one experience. You could go with alternatives like OwnCloud or Seafile, but in my opinion, none of them quite match Nextcloud for mimicking the feel of Google Photos or iCloud. Plus, Nextcloud Hub is officially supported on TrueNAS systems, and you can install the official app with just a few clicks, which is a big bonus.
Nextcloud has clients for pretty much everything: iOS, Android, macOS, Windows, and Linux. With a few simple clicks in the settings, you can get features like face recognition for your photos, geolocation, and there are tons of add-ons (they also call them “apps”) for calendars, contacts, notes, and so much more. It’s not just about storing files; it’s about creating your own little ecosystem of tools.
Security is also a big focus. Nextcloud offers many security features, both built-in and through plugins, like end-to-end encryption (E2EE) for specific folders and two-factor authentication (TFA). For me, it’s basically acting like Google Drive and Google Photos combined (I used to use both for different reasons). It backs up photos from my phone in the background, automatically, which is exactly what a real cloud application should do. Honestly, I consider myself a simple user of Nextcloud; I haven’t even dived deep into all its capabilities. But even with basic use, it’s powerful.
Before we start on deployment, we need to set up certificate.
Locking it Down: SSL Certificates with ACME on TrueNAS
Before we jump into deploying Nextcloud, we need to set up an SSL certificate. This is what gives you the little padlock in your browser and ensures your connection to your cloud is encrypted (HTTPS). We’ll use ACME, which is the protocol Let’s Encrypt uses, right on TrueNAS.
Here’s the basic process:
- In TrueNAS, you’ll add ACME DNS-Authenticators. You select your DNS provider. In my case, it’s Cloudflare, but they list many common ones. If yours isn’t listed, you might be able to use a custom script.
- Then, you add a Certificate Signing Request (CSR). For the profile, I recommend choosing EC (Elliptic Curve) because it’s newer and more modern than the older RSA.
- The Subject Alternative Name (SAN) is crucial. This needs to be the domain name you’ll use to access your Nextcloud. For me, I used a wildcard certificate like
*.bariss.dev. This means the certificate is valid for any subdomain ofbariss.dev(e.g.,cloud.bariss.dev). The “Subject” field itself isn’t super important for what you fill in, but TrueNAS makes you put something there. - Here’s a little TrueNAS quirk I found: The “Add” button under “Certificates” didn’t quite work as expected for creating the ACME certificate. Instead, you have to go to the CSR section and click an icon that looks like a repair tool, labeled “Create ACME Certificate.” This is one of those little things that can save you a headache!
- For the ACME Server Directory URI, choose Let’s Encrypt Production Directory.
- Then, select the authenticator profile you created earlier (like your Cloudflare one).
It should look like this:
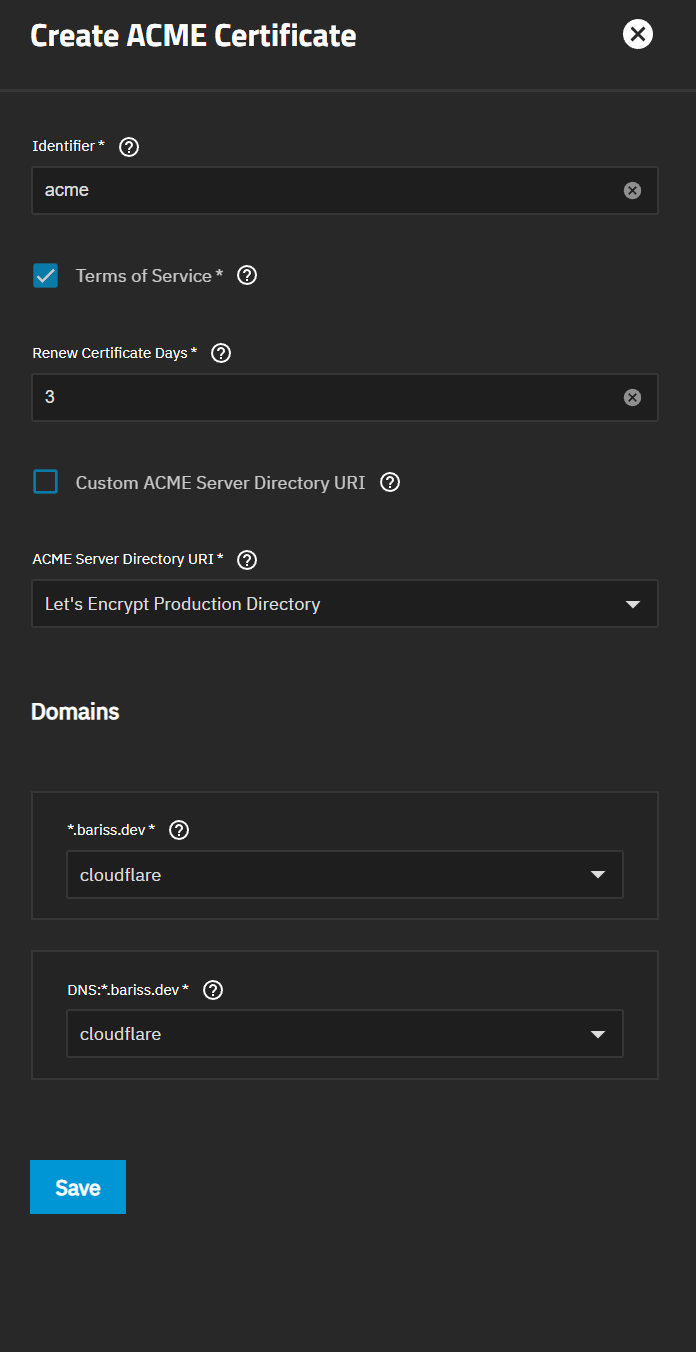
Once you save that, after a few moments, your ACME certificate should appear under the main “Certificates” list, ready to use.
My Nextcloud Deployment(Key Settings & Configs)
Okay, certificate in hand, let’s head over to the “Apps” section in TrueNAS and find Nextcloud to install it. It might take a few minutes for Nextcloud to fully deploy and show as “running” after you hit install, so grab a coffee if it seems stuck on “deploying” for a bit.
| Setting | My value | Notes |
|---|---|---|
| PostgreSQL Version | 17 | The database Nextcloud will use. |
| APT Packages | ffmpeg, ocrmypdf, libreoffice | ffmpeg is super important if you plan to store videos, as it helps with previews and transcoding. |
| Imaginary | Enabled | Helps with image previews for various formats. |
| Host | cloud.bariss.dev | Change this to your domain! If you don’t have one, you can leave it blank for local IP access. |
| PHP Upload limit | 100gb | How large a single file upload can be. |
| PHP Memory limit | 2048mb | Memory for PHP processes. |
| OPcache memory consumption | 256mb | Caching to speed up PHP. |
| Cron | Enabled | For Nextcloud’s background tasks (like cleanup, notifications). |
| Schedule | 0 * * * * | Cron schedule (this means run at the start of every hour). |
| Network Configuration | ||
| Port binding mode | Publish port on the host | Makes Nextcloud accessible on a specific port. |
| Port number | 30027 | The port Nextcloud will listen on. You can choose another if this is taken. |
| Certificate Id | acme | Select the ACME certificate we created earlier. |
| Storage | ||
| Type | hostpath | Strongly recommended! This makes your Nextcloud data directly accessible in a folder on your TrueNAS, much easier to manage than “ixVolume” |
Automatic permissions | Enabled | |
| Resources | ||
| CPU | 2 | |
| Memory | 2048mb |
A couple of important notes on these settings:
- That “Host” field (cloud.bariss.dev in my case) is where you put the domain you set up the certificate for. If you don’t have a domain yet and just want to test locally, you can often leave this blank, but then your browser will give you a warning about the certificate not being trusted if you try to use HTTPS with the TrueNAS-generated default one. It’ll still work, just with an annoying pop-up.
- For storage, seriously consider using “Host Path.” It maps a directory on your TrueNAS server directly to Nextcloud’s data folder. This gives you much easier control and visibility of your data compared to the default “ixVolume,” which is a bit more black-boxed.
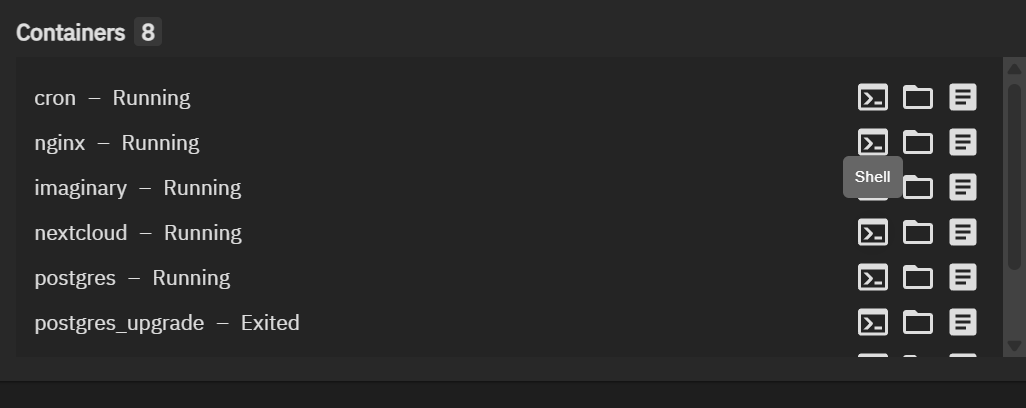
After installation, you should see a list of containers running for Nextcloud, like cron, nginx, imaginary, nextcloud itself, and postgres (the database).
If you ever need to run Nextcloud’s occ command-line tool (for maintenance or troubleshooting), there’s usually a “Shell” button next to the Nextcloud container in the TrueNAS Apps UI that lets you access its console.
Now, Nextcloud is installed, but we still need to make cloud.bariss.dev (or your domain) actually point to it correctly on your local network.
Smarter Home Network: AdguardHome for Local DNS (and Ditching Pi-Hole)
For managing how names like cloud.bariss.dev get translated to IP addresses on my local network (this is what DNS does), I’m using AdguardHome. And let me tell you, I’m incredibly happy with it.
I used to run Pi-Hole. It’s great, consumes fewer resources, and does the ad-blocking job well. But the one big thing that bugged me was its lack of native support for DoT (DNS over TLS). DoT encrypts your DNS queries, which is a nice privacy boost. Getting it to work with Pi-Hole involved extra configuration and some ugly “localhost hacks.”. The Pi-Hole team, for their own reasons, decided not to integrate this, focusing on “core functionality.”
AdguardHome, on the other hand, has a modern UI, native DoT support, easy DNS filtering, and it supports configuration via YAML files. This YAML support is great because I actually deployed AdguardHome into my Kubernetes cluster, and I manage its configuration with FluxCD, which automatically syncs it from Git and fixes it if anything breaks. So, my DNS server is super reliable.
Now, deploying it via Kubernetes is a bit advanced if you’re just starting. The good news is you can also install AdguardHome as an app directly on TrueNAS.
This is much simpler if you don’t want to mess with Kubernetes. If you go this route, your TrueNAS IP address will also become your local DNS server’s IP address.
If you would like to continue on Kubernetes go on. I already have a cluster, so why not?
Here’s the example deployment.yaml file:
apiVersion: apps/v1
kind: Deployment
metadata:
  name: adguardhome
  namespace: adguardhome
  annotations:
    reloader.stakater.com/auto: "true"
  labels:
    app: adguardhome
spec:
  replicas: 1
  selector:
    matchLabels:
      app: adguardhome
  strategy:
    type: Recreate
  template:
    metadata:
      labels:
        app: adguardhome
    spec:
      affinity:
        nodeAffinity:
          requiredDuringSchedulingIgnoredDuringExecution:
            nodeSelectorTerms:
              - matchExpressions:
                  - key: kubernetes.io/hostname
                    operator: In
                    values:
                      - homelab-cluster-1
      hostNetwork: true
      initContainers:
        - name: init-config
          image: busybox:latest
          command:
            [
              "sh",
              "-c",
              "cp /tmp/config/AdGuardHome.yaml /opt/adguardhome/conf/",
            ]
          volumeMounts:
            - name: config-template
              mountPath: /tmp/config
            - name: adguardhome-conf
              mountPath: /opt/adguardhome/conf
      containers:
        - name: adguardhome
          image: adguard/adguardhome:v0.107.62
          ports:
            - containerPort: 53
              protocol: TCP
            - containerPort: 53
              protocol: UDP
            - containerPort: 55080
              protocol: TCP
            - containerPort: 50443
              protocol: TCP
            - containerPort: 50443
              protocol: UDP
            - containerPort: 3000
              protocol: TCP
            - containerPort: 853
              protocol: TCP
            - containerPort: 784
              protocol: UDP
            - containerPort: 853
              protocol: UDP
            - containerPort: 8853
              protocol: UDP
          resources:
            limits:
              memory: 512Mi
              cpu: 100m
            requests:
              memory: 64Mi
              cpu: 10m
          volumeMounts:
            - name: adguardhome-data
              mountPath: /opt/adguardhome/work
            - name: adguardhome-conf
              mountPath: /opt/adguardhome/conf
      volumes:
        - name: adguardhome-data
          emptyDir: {}
        - name: config-template
          configMap:
            name: adguardhome-config
        - name: adguardhome-conf
          emptyDir: {}
After the deployment, you can simply run this command to print Adguardhome configuration:
kubectl exec -it $(kubectl get pods -l app=adguardhome -o jsonpath='{.items[0].metadata.name}') -- cat /opt/adguardhome/conf/AdGuardHome.yamlThen you can use it as configmap like this:
kind: ConfigMap
metadata:
  name: adguardhome-config
  labels:
    app: adguardhome
data:
  AdGuardHome.yaml: |
    http:
      pprof:
...
Whichever way you install it, you’ll want to configure AdguardHome with some upstream DNS servers. These are the servers AdguardHome will ask if it doesn’t know an address itself. I use encrypted ones:
tls://one.one.one.one
tls://dns.quad9.net
tls://unfiltered.adguard-dns.com
tls://dns.google
The magic part for our Nextcloud setup is DNS Rewrites in AdguardHome. This is where you tell AdguardHome: “Hey, if someone on my local network asks for cloud.bariss.dev, tell them it’s at this specific local IP address.”
To enable client-specific DNS query rewriting, you’ll first need to configure your clients. Navigate to Settings, then Client Settings, and click the “Add client” button. In the Identifier section, enter the CIDR block
100.64.0.0/10for Tailscale clients, and10.0.0.0/8(or your specific local IP block) for your local network clients.
In my AdguardHome config, I have something like this:
- cloud.bariss.dev points to 10.5.22.122 (This is my TrueNAS IP address where Nginx Proxy Manager will listen, more on that next!)
- adguard.homelab (my AdguardHome’s own admin page) points to 10.5.5.5 (This is the IP of the machine running AdguardHome).
'cloud.bariss.dev^$client=''local'',dnstype=A,dnsrewrite=NOERROR;A;10.5.22.122'
'adguard.homelab^$client=''local'',dnstype=A,dnsrewrite=NOERROR;A;10.5.5.5'
Finally, you need to tell your router to use your AdguardHome server as its primary DNS server. So, in my router settings, the primary DNS is set to 10.5.5.5. You can also set this manually on your computers and phones if you prefer.
After setting this up, if I run a dig cloud.bariss.dev command from a computer on my network, I should see it resolving to the local IP I set (10.5.22.122 in my case), not some public internet address.
dig query:
> dig cloud.bariss.dev

; <<>> DiG 9.18.30-0ubuntu0.22.04.2-Ubuntu <<>> cloud.bariss.dev
;; global options: +cmd
;; Got answer:
;; ->>HEADER<<- opcode: QUERY, status: NOERROR, id: 8480
;; flags: qr rd ra; QUERY: 1, ANSWER: 1, AUTHORITY: 0, ADDITIONAL: 0

;; QUESTION SECTION:
;cloud.bariss.dev.              IN      A

;; ANSWER SECTION:
cloud.bariss.dev.       10      IN      A       10.5.22.122

;; Query time: 3 msec
;; SERVER: 10.255.255.254#53(10.255.255.254) (UDP)
;; WHEN: Wed Jun 04 00:32:14 CEST 2025
;; MSG SIZE  rcvd: 50
Great! Our domain now points to the TrueNAS locally.
But if you try to access cloud.bariss.dev in your browser, nothing will welcome it on the standard web ports (80 for HTTP, 443 for HTTPS) just yet. That’s where our next tool comes in.
Smooth Access: Nginx Proxy Manager for TLS & Easy URLs
So, cloud.bariss.dev now resolves to our TrueNAS box thanks to AdguardHome. But Nextcloud is running on port 30027 (from our earlier setup), not the default web ports. We don’t want to type cloud.bariss.dev:30027 all the time, and we want that nice SSL security handled cleanly. Nginx Proxy Manager (NPM).
NPM is a fantastic tool that gives you an easy web interface to manage Nginx, which is a powerful web server and reverse proxy. It will listen for traffic coming to cloud.bariss.dev and smartly forward it to our Nextcloud app on its specific port, handling SSL termination along the way. Many people use it for exactly this kind of setup with TrueNAS and Nextcloud.
First, a little prep work on TrueNAS. By default, the TrueNAS web UI itself uses ports 80 and 443. NPM needs these ports. So, we need to change the TrueNAS UI ports.
Go to System > General Settings > UI in TrueNAS and click Edit. Change HTTP Port from 80 to something else, like 81, and HTTPS Web Port from 443 to something like 444. 1 After you save, your connection to the TrueNAS UI will drop, and you’ll need to reconnect using the new port (e.g., https://your-truenas-ip:444).
Now, install Nginx Proxy Manager from the Apps section in TrueNAS.
- There’s a handy tip: if you’re installing on TrueNAS, adding an environment variable
S6_STAGE2_HOOK=sed -i $d /etc/s6-overlay/s6-rc.d/prepare/30-ownership.shcan prevent a really long restart time for the NPM app due to some permission things. It can make restarts take seconds instead of 30 minutes… - For NPM’s own configuration during install:
- WebUI Port: Set this to something like 30020. This is the port you’ll use to access the NPM admin page.
- HTTP Port: Set this to 80.
- HTTPS Port: Set this to 443. These ports should be set to “Publish port on the host.”
After NPM deploys, you can access its web UI at http://your-truenas-ip:30020.
The default login is:
- User: [email protected]
- Pass: changeme
Inside NPM, first, let’s get an SSL certificate for our domain.
- Go to the “SSL Certificates” section and click “Add SSL Certificate.” Choose “Let’s Encrypt.”
- Since this setup is initially for local access and we’ll use Tailscale for outside access (more on that later), using the DNS Challenge method is our best bet.
- Enter your Domain Names (e.g.,
*.bariss.dev). - Enter your email address.
- Select your DNS Provider (e.g., Cloudflare).
- You’ll need to provide your DNS provider’s API credentials. For Cloudflare, this is an API token. Make sure the token only has permissions to edit DNS records for the specific zone (domain) you are using. This is the same principle as the ACME setup in TrueNAS.
Agree to the Let’s Encrypt Terms of Service and Save. It might take a few seconds or minutes for the certificate to be issued.

Once you have the certificate (it will show up in your list), it’s time to set up the proxy host for Nextcloud.
- Go to “Hosts” -> “Proxy Hosts” and click “Add Proxy Host.
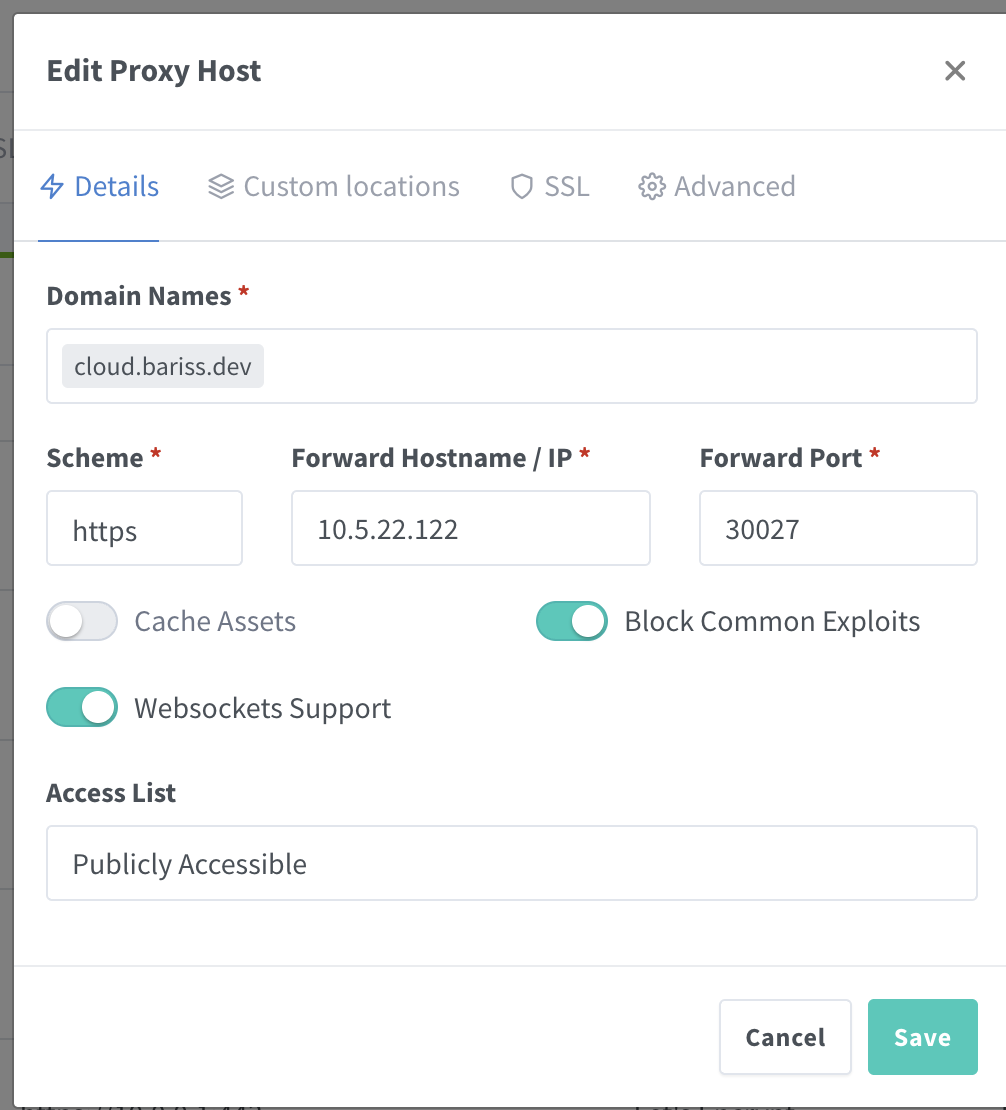
- On the Details tab:
- Domain Names: cloud.bariss.dev (or your domain)
- Scheme: https (because our Nextcloud app itself is using the certificate we set up in TrueNAS, so traffic between NPM and Nextcloud can be HTTPS)
- Forward Hostname / IP: Your TrueNAS IP address (e.g., 10.5.22.122)
- Forward Port: The port Nextcloud is listening on (30027 in our example)
- Toggle on Block Common Exploits and Websockets Support.
- On the SSL tab:
- Select the SSL Certificate you just created in NPM (e.g., *.bariss.dev).
- Toggle on Force SSL, HSTS Enabled, and HTTP/2 Support.
- Save
Now, when you go to https://cloud.bariss.dev in your browser, NPM should answer, use its SSL certificate for the connection to your browser, and then forward the traffic securely to your Nextcloud instance running on port 30027. You get a clean URL and proper SSL!
You might wonder, why set up a certificate in TrueNAS for the Nextcloud app and another one in NPM? Good question!
The NPM certificate is what your browser sees. The certificate on the Nextcloud app in TrueNAS means the traffic between NPM and Nextcloud itself is also encrypted. It’s like an extra layer of security within your own network. As I thought, “if we can have it, why don’t we? It’s also encrypting traffic between NPM and actual service as well.”
At this point, your Nextcloud instance should be reachable on your local network via https://cloud.bariss.dev. Sweet! But what about when you leave the house?
Global Access: Tailscale + VPN on Demand
Okay, local access is working beautifully. But this is supposed to be a replacement for Google Drive, right? I need to access my files when I’m out and about.
Basically, you have two options for remote access:
- Connect via a VPN.
- Make your domain public and open ports on your router (port forwarding or with Cloudflare tunnel).
Since this is my private cloud, I don’t want it just hanging out on the public internet if I can avoid it. So, I chose the VPN route. And for that, I use Tailscale.
Why Tailscale? Several reasons:
- Ease of use: The UI is fantastic, and managing devices is super simple. It’s like a kid’s play compared to some other VPN setups.
- Wireguard protocol: It uses the modern, fast, and secure Wireguard protocol by default.
- Auto NAT Traversal: This is a game changer. You generally don’t need to do any port forwarding on your router. Tailscale just figures out how to connect your devices. This is a huge win for simplicity and security.
- Ready to use clients: There are Tailscale apps for pretty much every device you can think of (iOS, Android, Windows, macOS, Linux).
- Free for many: Tailscale is free for up to 3 users and 100 devices, which is perfect for personal or small family use.
I won’t go into every detail of Tailscale here, but here’s how I integrated it:
- Create a Tailscale account.
- Install Tailscale on your TrueNAS server. In the TrueNAS Apps, you can find Tailscale and install it. During setup, it’ll give you an authentication command to run or a URL to visit to link it to your account.
- Install Tailscale on the machine running your AdguardHome DNS server. If you installed AdguardHome directly on TrueNAS, then step 2 covers this. If you (like me) run AdguardHome elsewhere (e.g., a Kubernetes node), install Tailscale there too. This is so your devices on the Tailscale network can use your AdguardHome for DNS.
- When adding a server to Tailscale, you can use their “Add device” option in the Tailscale admin console, choose “Linux Server,” and it will give you a one-line install script with an auth key.
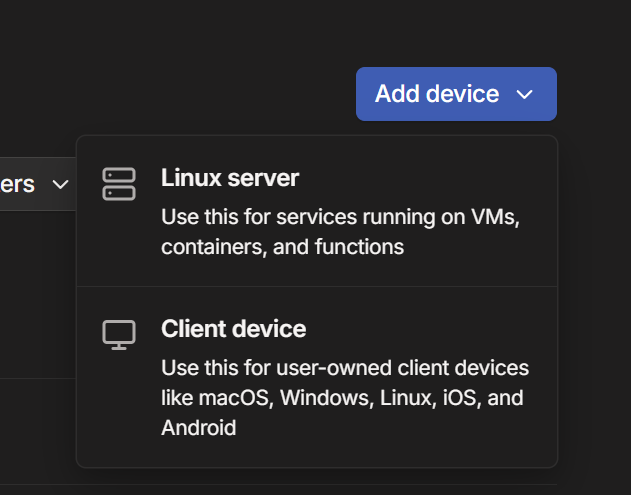
Installation script looks like this:
curl -fsSL https://tailscale.com/install.sh | sh && sudo tailscale up --auth-key=tskey-auth-kdaxxxxs11CNTRL-TVLMFGxxxxxxxOnce your TrueNAS machine and your AdguardHome machine are on Tailscale, they will each get a new IP address in the 100.x.x.x range. Note these down. Let’s say:
| Service/Machine | Local IP Address | Tailscale IP Address |
|---|---|---|
| AdguardHome DNS Server (also Kubernetes node) | 10.5.5.5 | 100.99.224.55 |
| TrueNAS (running NPM & Nextcloud) | 10.5.22.122 | 100.x.y.z |
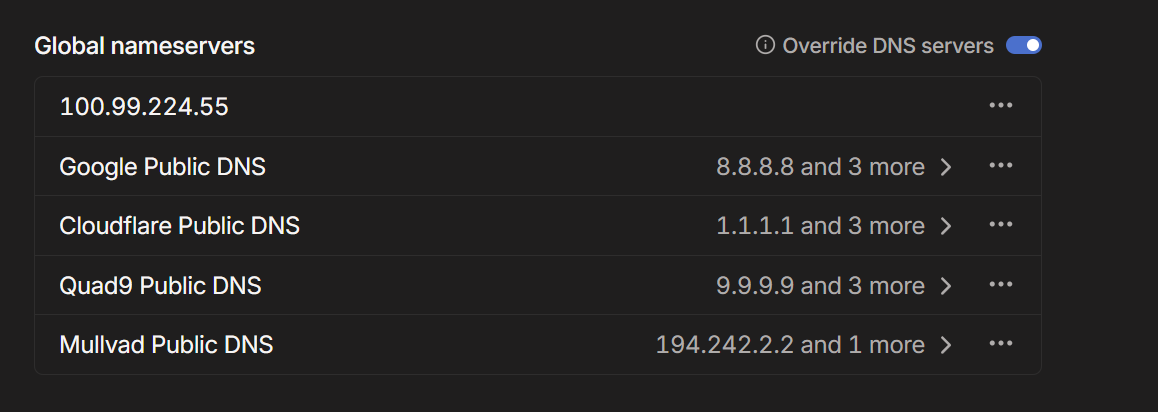
Now, in the Tailscale admin console, go to the DNS section:
- Under Global nameservers, add the Tailscale IP address of your AdguardHome server (e.g., 100.99.224.55).
- Toggle ON the “Override local DNS” setting. This tells Tailscale clients to use the DNS servers you just specified, ensuring they can resolve cloud.bariss.dev correctly through your AdguardHome, even when remote.The DNS queries work in order. So, Tailscale will first try your AdguardHome. If that fails (which it shouldn’t), it might fall back to public DNS servers if you have any others listed
Heads-up for Linux users: some installations configure
resolv.confto use Tailscale as the default resolver. If you enable the ‘Override DNS servers’ feature in this scenario without specifying any upstream DNS servers, your system will likely throw name resolution errors.
The final piece of magic is on your mobile devices. On my iPhone, Tailscale has a feature called “VPN On Demand.” You can configure it to:
- Connect automatically on Wi-Fi or Cellular.
- Except when connected to specific Wi-Fi networks (like your home Wi-Fi, where you don’t need Tailscale for local access).
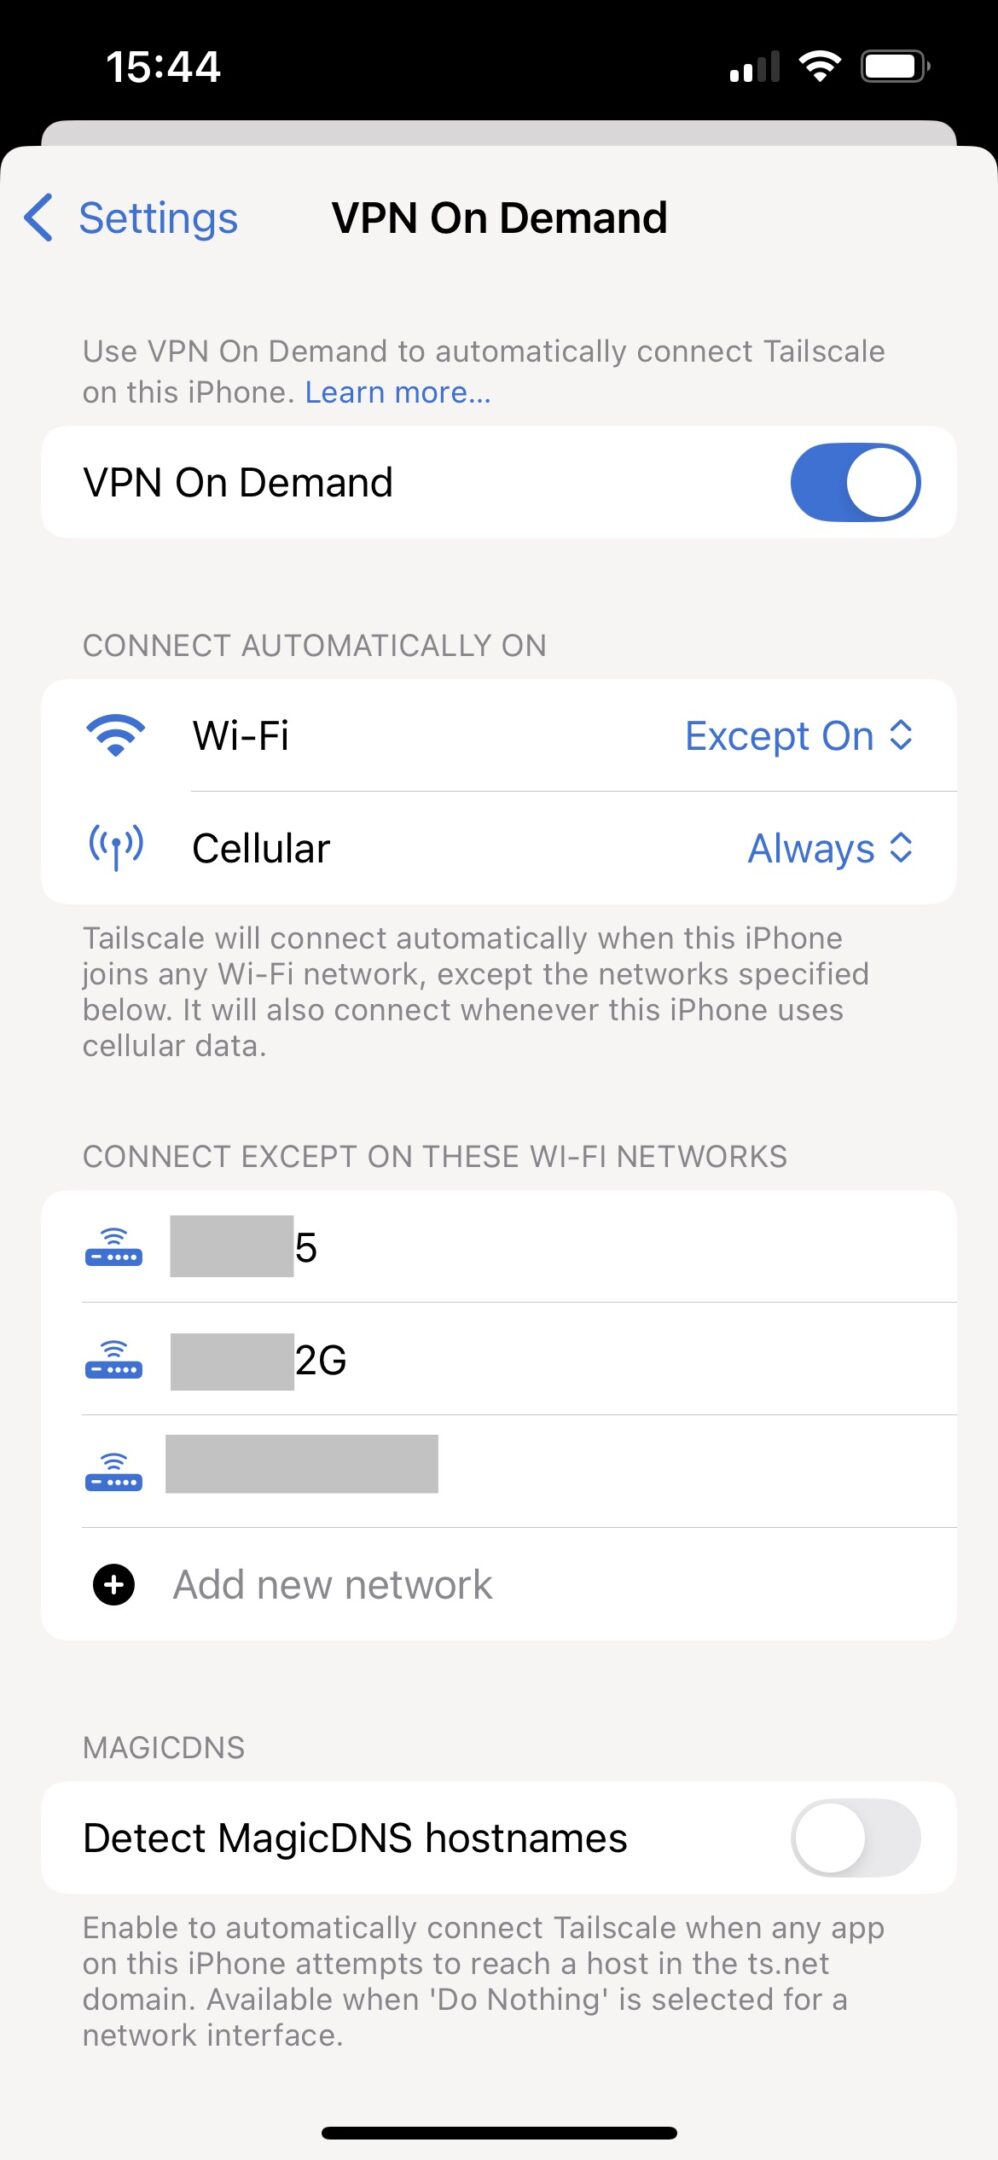
So, if I’m at home, my phone accesses cloud.bariss.dev directly on my local network.
If I step outside and my phone switches to cellular or connects to another Wi-Fi, Tailscale automatically connects, and cloud.bariss.dev still works seamlessly, now securely routed through the Tailscale VPN to my AdguardHome (for DNS) and then to NPM and Nextcloud on my TrueNAS.
The beauty is that it doesn’t necessarily route all my internet traffic through Tailscale, only the traffic for my Tailscale network resources (like cloud.bariss.dev) if configured that way (using “Split DNS” or by how Adguard resolves it). It’s pretty fast too!
This combination of AdguardHome for local DNS rewrites and Tailscale for secure remote access with its own DNS management means cloud.bariss.dev just works, whether I’m on my couch or kilometers away.
The Doomsday Plan: Offsite Backups with Azure Blob Storage
Everything is looking pretty good so far. My data is on my hardware, accessible from anywhere. But it’s still just a computer in my cellar. What if there’s a fire, a flood, or a catastrophic hardware failure that takes out both my mirrored drives? That’s a huge risk I’m not willing to take for my important digital assets.
So, I needed an offsite backup. For this, I decided to use Azure Blob Storage, specifically their archive tier.
You could use AWS S3 Glacier, Google Cloud Coldline, or another provider; the principle is the same. Pricing is the same (or very similar 1$/tb/mo)
I chose Azure because I have free tier in there.
Now, the catch with archive tiers is that while it’s cheap to store, it’s more expensive and slower to retrieve data. If you need to get your data back from the archive tier to a “hot” tier (so you can download it) (rehydration), you’ll pay a bit, maybe $20-$30 for that 1TB, plus egress costs for downloading. But this is for a “last man standing” situation, a true doomsday scenario. In that case, I’d be more than happy to pay that to get all my data back rather than losing it forever.
And NAS systems are generally reliable; they don’t just break for no reason.
Here’s how I set it up:
- Azure Setup:
- In the Azure portal, create a Storage Account.
- Azure Blob Storage doesn’t let you set “Archive” as the default tier for the whole account directly. So, you need to create a Lifecycle Management rule. This rule automatically moves your data to the cheaper Archive tier after a certain number of days (I set mine to 0 days after modification, so it moves them in first run). JSON for a rule that moves blobs to archive immediately:
{
  "rules": [
    {
      "enabled": true,
      "name": "archive",
      "type": "Lifecycle",
      "definition": {
        "actions": {
          "baseBlob": {
            "tierToArchive": {
              "daysAfterModificationGreaterThan": 0
            }
          }
        },
        "filters": {
          "blobTypes": [
            "blockBlob"
          ]
        }
      }
    }
  ]
}- Lifecycle manager jobs on Azure usually run daily, so your files will move to the archive tier after the next run (e.g., after midnight). This is super important for cost savings.
- For encryption, you can just use Azure’s standard encryption-at-rest. TrueNAS can encrypt the data before sending it anyway.
- TrueNAS Cloud Sync Task Setup:
- In TrueNAS, go to Data Protection -> Cloud Sync Tasks and click Add.
- Credentials: Create new credentials. Select “Microsoft Azure Blob Storage” as the provider. You’ll need your Azure storage account name and one of its access keys. The endpoint will be something like
https://yourstorageaccountname.blob.core.windows.net/. - Task Configuration: Here are my key settings for the sync task:
| Setting | My Value | Notes |
|---|---|---|
| Direction | PUSH | Send data from TrueNAS to Azure. |
| Transfer Mode | COPY | Copies new/changed files. |
| Directory/Files | /mnt/pool0/nextcloud/userdata | This is the hostpath we set when installing Nextcloud, where all user data lives. Adjust to your path. |
| Folder (on Azure) | /nextcloud-userdata | The folder name within your Azure Blob container. |
| Remote Encryption | Enabled | Crucial. TrueNAS encrypts the data before sending it to Azure. You set a password for this. |
| Use Snapshot | Enabled | Backs up from a consistent point-in-time snapshot. (If you don’t see this, save and re-edit the task). |
| Transfers | low bandwidth – 4 | Adjust based on your internet speed. |
| Schedule | Weekly (or Daily) | How often the backup runs. Depends on your needs and internet speed. |
- You can choose a single container (like “backup”) in your Azure storage account for this.
- For a first run, maybe pick a small subfolder to sync and wait 24 hours to check if the Lifecycle Management rule in Azure correctly moves the test files to the Archive tier. You’ll see your files under your container, like
backup/nextcloud-userdata.
With this setup, even if my entire homelab goes up in smoke, I can get a new TrueNAS server, connect it to Azure, and restore my data.
I’m pretty relaxed knowing my data is end-to-end encrypted by Nextcloud (for files I choose to E2EE there), then encrypted again by TrueNAS before it even leaves my house for Azure, and then Azure encrypts it at rest.That’s multiple layers of protection.
The Verdict: Living the Self-Hosted Dream – Pros, Cons, and Real Talk
So, after all that, was it worth it? For me, absolutely.
As I mentioned, the primary reason was my privacy. For some people, it might be about saving money in the long run. For others, it’s just a cool hobby.
Of course, running your own cloud isn’t all sunshine and rainbows. There are definitely some things to consider:
- You are the IT department. You need to take care of updates for TrueNAS, Nextcloud, and all the other bits. You need to do maintenance. And it often requires a fair bit of reading and learning.
- Initial setup takes time and effort. This guide is long for a reason.
But when it becomes a useful hobby project, it also feels much more fun and rewarding. And honestly, these kinds of things are often achievable with even older computer hardware that might be gathering dust in a corner. You might need to spend a little on some hard drives, but you don’t necessarily need a super powerful server.
Let’s summarize the awesome benefits I’ve got from this setup:
- A globally accessible storage unit system that stays in my home. I own the hardware. Period.
- End-to-end encrypted backups and file access via Nextcloud.
- Encrypted offsite backups to Azure Blob Storage for that “doomsday scenario.”
- Automatic photo and video backup from my phone straight to my server.
- Exceptional speed for accessing files when I’m on my home network because there are no extra layers, no external load balancers for local access, and it just uses my average internet connection when remote via Tailscale.
One clear disadvantage of my current private setup is that I can’t easily share download links with people outside my Tailscale network, unless I decide to make specific services publicly accessible (which would involve more configuration with Nginx Proxy Manager and potentially Cloudflare Tunnels or similar, and thinking more about security). But for my primary goal of a private cloud, this is a trade-off I’m fine with.
Even in this setup, there are tons of things that could be optimized or done differently. But as I often think, why overengineer it if it works well and meets your needs?
Anyway, if you also want to have your own private cloud with all these features and trust me, there’s a lot more you can discover in Nextcloud’s app store I hope this guide gives you a solid roadmap to follow. It’s a journey, but owning your data and having this level of control is, in my book, totally worth it.
Have a nice one! And if you have questions, drop them in the comments below, I’ll try to help if I can.